Thursday, December 30, 2010

ISPOperationQueue Error


If you are using AgilePoint Integration for SharePoint and you get an error like this:

2010-12-20 13:11:06.787 >>> UpdateInfoPathFile, System.InvalidCastException: Unable to cast object of type 'Ascentn.Workflow.Base.WFIntegratedApplication' to type 'Ascentn.SharePoint.AgileParts.ISPOperationQueue'.

at Ascentn.AgilePart.SharePoint.SPSAgileParts.DropToQueue(WFProcessInstance pi, WFAutomaticWorkItem w, IWFAPI api, SPOperation operation)

at Ascentn.AgilePart.SharePoint.SPSAgileParts.UpdateInfoPathFile(WFProcessInstance pi, WFAutomaticWorkItem w, IWFAPI api, NameValue[] parameters)


That is because you have not set up the AgileConnector info at AgilePoint Server Configuration panel. The assembly, Ascentn.SharePoint.AgileConnector.dll, is located in the bin folder of AgilePoint Server. This dll is available with the installation of AgilePoint Server, but it is not configured by default. See picture below for the configuration example.

image

Impersonator Error

It's very common to see this error:

Failed to logon to AgilePoint.|Server was unable to process request. ---> 1DCED31183B04261896B23C4452276F1_AGILEPOINTUser 'YOURDOMAIN\YourUsername' is not recognized as the impersonator for 'xxxSomeApplicationNamexxx' on machine='YourMachineName'. This may occur because a) the AgileConnector is not configured properly, or b) the server license does not support 'xxxSomeApplicationNamexxx'. Please contact system administrator.AGILEPOINT_1DCED31183B04261896B23C4452276F1 System.Web.Services.Protocols.SoapException SoapException System.Web.Services.Protocols.SoapException: Server was unable to process request. --->


The error simply means the configuration is not set up at AgilePoint Server Configuration tool, i.e. 'YOURDOMAIN\YourUsername' is not set up as the impersonator for application 'xxxSomeApplicationNamexxx'. See picture below. Refer to page 28, 4.1.1.3 Extension Window, in v5.0 User Guide for full details.

image

Process Instruction for Bulk Migration

I was asked below question:

I (actually our client) is using the bulk migration (apadm) to migrate workflow to a new version. They migrated one using Enterprise Manager and saved the instruction file. They indicated that the remaining workflow need to be in the same activity as the initial one. Is that true? Could you explain the NOTE in the User Guide - "match the original process instance exactly".

NOTE: Only process instances that match the original process instance exactly will be included in each batch migration, for example the target process instances have to be at the same running state as the original process instance. The bulk migration automatically suspends and resumes each of the process instances.

------------------------

Here is the situation:

After you created one process instruction and run the bulk migration with the apadm tool, the apadm tool will only migrate those process instances match exactly the same as specified in the process instruction.

You may group your process instances according to different running state, for example, you have 500 process instance currently in Manual Activity A (group 1), 200 process instances currently in Manual Activity B (group 2). You may create two process instructions, i.e. one for group 1 and one for group 2. Then run the process instructions with apadm tool.

Wednesday, December 29, 2010

AgilePoint Web Application - SetClientAppName Error


A customer is migrating the AgilePoint web application to a new machine and got below error. The web application and AgilePoint Server are located on two different machines. These two machines are referred as web server and AgilePoint Server in below context.

The web service call "SetClientAppName" throws an exception.


The Exception Message:
  System.Web.Services.Protocols.SoapException SoapException System.Web.Services.Protocols.SoapException: Server did not recognize the value of HTTP Header SOAPAction: http://tempuri.org/SetClientAppName

Code Snippet that makes the web service call:
                // Workflow Web Service
                _logger.Trace("Creating workflow service");
                WorkflowService api = new WorkflowService(url);

                _logger.Trace("Applying credentials and cookie container");
                api.CookieContainer = cookieContainer;
                api.Credentials = credentials;

                // this app name needs to be registred in AP Config utils, Extensions,
                // along with the impersonator: domain\name of the credentials above
                _logger.Trace("Setting AgilePoint \"impersonation\" values");
                api.SetClientAppName("PerillonWorkspace");
                api.SetClientLocale("en-US");

System Details:
Agile point server: Ver. 5.0.


Troubleshooting:

  • In the web server (not AgilePoint Server), try to browse the workflow.asmx file (http://MyAPServer.MyDomain.com:9001/AgilePointServer/Workflow.asmx). Get the AgilePoint Server URL from the web.config file of the web app. This is to check if there is any communication error between AgilePoint Server and the web server.
  • If the AgilePoint Server is set up correctly, the workflow.asmx page shall load correctly. If you are asked for username and password, that means AgilePoint Server is not set up properly.
  • Check the followings:
    • Make sure the Windows Authentication is enable for AgilePoint web site, and it's parent node in IIS.
    • Make sure the user account used for the Application Pool of AgilePoint Server is included in the local machine administrator group and IIS_WGP group.
    • Refer to Pre-Installation Guide for other important setup details.
    • Make sure the AgilePoint URL in the web.config of the web application is a correct URL. It is best to use DNS name in the URL, instead of IP address.
    • When loading the workflow.asmx file within the web server, check if it is recognized as a "Internet" site at the right bottom corner of IE. AgilePoint Server shall be recognized as a "Intranet" site to the web server. If AgilePoint Server is recognized as "Internet" site, you may temporary add AgilePoint URL into the Intranet zone of the web server (at Internet Option of IE). But, the best way to configure this is to set up a trust between AgilePoint Server and the web server. Your network admin shall be able to help you on this.

Select Root Node for WF Controls with Repeating Nodes


In AgilePoint User Guide, for those WF Controls that needs repeating nodes in XML structure, select the root node of the repeating node for the Binding Name property.

For example, the xml for WFComment requires repeating nodes. This is obvious, I believe most of the developer can figure that out. But the node to be selected for the binding is the root of the repeating nodes. In below example, Comments has to be selected, and not any of the two child nodes 'Comment'.

This applied to other WF Controls like WFGridView too.


Tuesday, December 28, 2010

Displaying Non-editable Previous Workflow Comments


I was asked the following question:

"I am looking for suggestion to best capture and display approvers' comments in a SharePoint integrated environment.

I tried to use ListForm that stores the comments in SharePoint columns. However, right after a file is uploaded, the user is alway redirect to the editform page that allows him to edit all the comment columns.

Then I tried the out of the box approval form. However, it seems the AllParticipantCommentsHtml attribute can only be used in email, not in the processviewer or a web page.

Any suggestion is greatly appreciated."

I suggested the user to use WFComment that comes with Developer. (See Page 220, under WFComment section in the v5.0 User Guide for more details)


Alternatively, if something more customized is needed, AgileReports may be the next thing to consider. It not only allows you to pull the comments of a process instant, but also let you to query other process data to make a customized report that suits your needs.

But the user prefers something out of the box without much configuration. So, I suggested the following:

If you just want to keep the past comments not editable is SharePoint, you may use the out of the box feature from SharePoint. Make sure the type of your comment column is 'Multi Line of Text' and select 'Yes' for 'Append Changes to Existing Text' for your comment column.

--------------


Tuesday, December 21, 2010

Password Changes for SharePoint v1

Here is a quick reference of places you may check for the case of username/password change. Reset IIS for AgilePoint and SharePoint after changes are maded. Please refer to AgilePoint Installation Guide for full details.


  • SharePoint Impersonator password at Domain Controller (Contact your network admin)
  • If it is a new domain user account, check if you have added this new user account as the administrator of the SharePoint site where AgilePoint integration is used.
  • SharePoint Configuration Manager at SharePoint machine
    • Impersonator tab
    • Database tab
  • SharePoint Application Pool at the IIS Manager in SharePoint machine
  • AgilePoint Application Pool at the IIS Manager in AgilePoint machine
  • AgilePoint Server Configuration tool in AgilePoint machine
    • System tab
    • Database tab – Main Database and Archive Database (if you are using archive database)
    • Extension tab


Wednesday, December 8, 2010

How to Create a Simple SharePoint List Form Application using AgilePoint


  1. Creating a New SharePoint List
    1. Create a list in SharePoint using the 'Custom List' template provided by SharePoint. (View All Site Content > Create > Custom Lists > Custom List)
    2. Create the desired columns in the SharPoint List. This columns can be used as meta data in AgilePoint process template.
  2. Creating a Process Template
    1. Using Envision, create a process template using Microsoft SPList (File > New > AgilePoint > Microsoft SPList).
    2. Enter the URL of the SharePoint List that you just created. This will pull the columns info from the SharePoint List and can be used for metadata binding.
    3. Enter 'SPSIntegration' (case sensitive) for the Application Name of the process template. This step is crucial, if not, this process template will not show up in the available process templates list when you enable the SharePoint List to have AgilePoint capability later.

    4. Construct your workflow as desired. Use the ListForm shape from SharePoint stencil for your Manual Activity (see below). Manual Activity shape from the Generic stencil does not work in this case.

    5. Bind the necessary metadata in your process template, i.e. binding the columns from SharePoint List to shapes (Single Condition, Multiple Condition, etc) in the process template.
    6. Validate your process template.
    7. Publish the process template to AgilePoint Server.
  3. Enabling AgilePoint Capability at SharePoint List Form
    1. In the SharePoint List, go to the 'Add a Workflow' page (Settings > List Settings > Permission and Management > Workflow setting).
    2. Select/enter below values for the fields on the page, then click 'Next'.
      1. Workflow: AgilePoint Process Launcher
      2. Name: Enter any unique name for the workflow
      3. Start Options: Start this workflow when a new item is created.

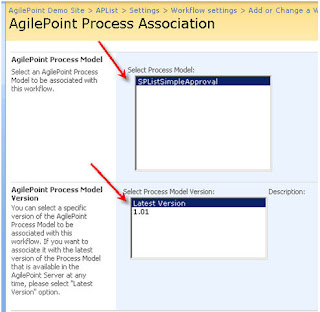
    3. AgilePoint Process Association will be displayed. Select below values, and click Submit.
      1. AgilePoint Process Model: select the process template desired
      2. AgilePoint Process Model Version: select the Latest Version. This option will always pick up the latest version of that process template when initiating new process instance.

    4. To make sure SharePoint List is enabled correctly, a new column with the same name of your SharePoint List will be added. After you initiated your first process instance by creating a new item in the list, a link with display text of 'In Process' will be visible under this column.


Tuesday, December 7, 2010

Synchronous and Asynchronous AgilePart

In the constructor of AgilePart descriptor, the Synchronous property is set to true by default. This makes the AgilePart operates in synchronous basis, i.e. the process waits until the execution of the AgilePart finished before it promotes to the next activity. Also because of the AgilePart is running under a synchronous mode, the process is considered ‘active’ and the object remains in the memory, not being swap out for better server performance.

public class MyAgilePartDescriptor : WFAgilePartDescriptor
{
public MyAgilePartDescriptor()
{
base.Synchronous = true;
}
}


If your server always have high load, you may utilize the asynchronous capability of AgilePart. To implement this, just set the Synchronous property to false. The process still waits for the AgilePart to complete before promoting to the next activity, but the memory of the process instance object is swapped out from the memory, and hence releasing the resource for other server processing needs. Besides the asynchronous behavior, any other thing of an asynchronous AgilePart is the same as synchronous AgilePart, i.e. the way to debug an AgilePart, the logging behavior, credential used to run the AgilePart, deployment of the AgilePart, etc.

Implementing Asynchronous AgilePart

Here is an example:- an asynchronous AgilePart calls an external web service (or any external service) for some data processing. The action for the data processing might take a few weeks. In this case, the resource for the process instance shall be swapped out from the memory of AgilePoint server for better performance.

i. In AgilePart code, set the Synchronous property to false (This is set to true by defalt).
public class MyAgilePartDescriptor : WFAgilePartDescriptor
{
public MyAgilePartDescriptor()
{
base.Synchronous = false;
}
}
ii. Pass the automatic work item ID when calling external service.
public void Method1(
WFProcessInstance pi,
WFAutomaticWorkItem w,
IWFAPI api,
NameValue[] parameters)
{
try
{
CallExternalService(w.WorkItemID);

if (w.Synchronous) MarkSuccess(api, pi, w, parameters);
}
catch (Exception ex)
{
HandleException(api, pi, w, parameters, ex);
}
}

iii. Once the AgilePart activity is exited, the status of the Automatic work item is set to “Waiting”. The process does not promote to the next activity.
iv. The external service that works with the asynchronous AgilePart shall call the CompleteProcedure function passing in the automatic work item ID (see example below) to notify AgilePoint server that the processing is completed, and AgilePoint Server set the status of this Automatic Work Item to “Completed” and promote the process instance to the next activity.

public void CallExternalService(string autoWorkItemID)
{
//....some processing codes here


IWFWorkflowService api = GetWorkflowService(); // refer tohttp://kb.ascentn.com/KB/KnowledgebaseArticle10020.aspx for details on getting workflow service object
api.CompleteProcedure(autoWorkItemID);

return;
}

Tuesday, September 21, 2010

How to Sysprep a Virtual Machine


  • Install all the Windows updates and software needed.
  • Obtain the sysprep tool
  • Prepare SysPrep.inf (See example below)
  • Boot up the vm.
  • Copy the sysprep tool and SysPrep.inf into the vm, e.g. to a folder c:\Sysprep.
  • Extract the sysprep tool cab file, you will see the Sysprep.exe and other files needed by the tool.
  • Put the SysPrep.inf under the same folder of sysprep.exe
  • Run sysprep.exe. Click "OK
    • This starts the Sysprep process. Click "OK" to clear the warning dialog.
    • Select "Do not reset grace period for activation."
    • Make sure that the shutdown mode is "Shutdown."
    • Click "Reseal."
    • When prompted about regenerating SIDS, click "OK." The guest operating system will be Sysprepd and will automatically shut down.

Content of SysPrep.inf file:

;SetupMgrTag
[GuiUnattended]
TimeZone=4
OEMSkipRegional=1
OemSkipWelcome=1
EncryptedAdminPassword=NO
OEMDuplicatorstring="Microsoft Windows Server 2003 Enterprise Edition Service Pack 1"

[Identification]
JoinWorkgroup=WORKGROUP

[Networking]
InstallDefaultComponents=Yes

[LicenseFilePrintData]
AutoMode=PerServer
AutoUsers=50

[Unattended]
OemSkipEula=Yes
InstallFilesPath=C:\sysprep\i386

[UserData]
FullName="Your_Full_Name_Here"
OrgName="Your_Org_Name_Here"
ProductKey=Your_Product_Key_Here

[SetupMgr]
DistFolder=C:\sysprep\i386
DistShare=windist

Wednesday, July 21, 2010

Migrating Virtual Server VHD to Hyper-V

    This post was republished to Choyling's Blog at 12:21:02 PM 7/26/2010

    Migrating Virtual Server 2005 R2 VHD to Hyper-V

    Here is the sequence of migrating VPC from Virtual Server 2005 R2 to Hyper-V that I found efficient.

    My VPC configuration: Windows 2003 SP1, 32 bit OS

    Before plugging in the vhd to HyperV:

    • Install latest Windows updates, Windows 2003 SP2 is needed in order to install Hyper-V Integration Services later.
    • Install other software needed.
    • Uninstall Virtual Machine Addition. Do this the last step, as the control over mouse of the VPC will be lost.
    • Merge Undo disk.

    After completing steps above, copy the vhd to Hyper-V box.

    · Create a VM in Hyper-V, and plug the vhd to the VM in Hyper-V.

    · For my case, my original VPC is non ACPI HAL, but ACPI HAL is needed to install Hyper-V Integration Services.

    o The error I got is “Setup cannot upgrade the HAL in this virtual machine. Hyper-V integration services can be installed only on virtual machines with an ACPI-compatible HAL.”

    o There are some posts for the error above, but none of them work for me.

    § I can’t remove the ‘Standard PC’ in Device Manager. ( http://www.k2underground.com/blogs/johnny/archive/2009/07/23/hyper-v-tips-and-tricks.aspx )

    § The trick of expand the HALACPI.DL_ from the Windows 2003 CD does not work for me. I got blue screen error after doing this. ( http://www.annoyances.org/exec/forum/winxp/1047782036 )

    o But instead, I found a solution like this.

    § Obtain the Windows 2003 CD. It’s best to get the Windows 2003 R2 CD. i.e. this contains Windows 2003 SP2, so that you do not have to upgrade to Windows 2003 SP2 later. If you use Windows 2003 CD without SP2, you will need to upgrade to Windows SP2 before you will be able to install the Hyper-V Integrated Services.

    § Attach the Windows 2003 CD to the VM, and boot up the VM from CD.

    § Windows Setup will be started. The Setup will detect there is a previously installed Windows and prompt if you want to repair or reinstall a fresh copy of Windows. Do a repair in this case (Choose Setup (press Enter) > I agree (press F8) > Repair (press R)). See pictures below. This repair will take a while.

    The upgrade will correct the HAL option for you.