Wednesday, May 31, 2017

Data Security I

Managing Users
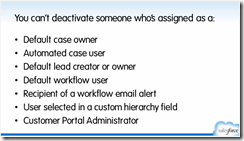
  • It’s best to deactivate user than delete the user, to avoid orphan processes.
  • image_thumb11
  • If user can’t be deactivated due to above reason, to quickly remove user access, use Freeze user under user profile. Later, you can reassign new owner/default user/lead/etc, and deactivate the user.
  • image_thumb2
Control Access to Objects
  • 2 ways to set object permission - Profile & Permission Set.
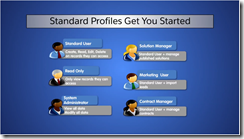
  • Big picture of Profile: Profile controls - 
    • image
    • image_thumb31
    • System Administrator profile’s super powers – View all data & Modify all date -  overwrites all other sharing rules and settings. Use with caution.
  • Can set system permission in profile. System permissions apply across apps, e.g. create/edit/delete reports, edit Read Only fields.
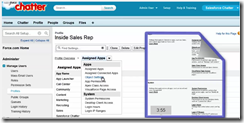
  • Profile contains Apps & System sections. These 2 sections are also available from the Assigned Apps drop down list on the profile page.
    • image_thumb4
  • Even an app is hidden, but user might still see the records of the app in Reports/Dashboard/related list. It’s best to remove the read permission from the object permission.
  • Assign profile to user at Manage Users > Users > select user > Edit > select profile from drop down list.
  • Check who has this profile: Manage Users > Profiles > Assigned Users button on the top middle.

Thursday, May 18, 2017

Formulas & Validations

Creating a New Formula Field

You can create custom formula fields on any standard or custom object. To start, we’ll create a formula on the Account object. Follow these steps to navigate to the formula editor:

  1. Go to the Accounts page from setup.
  2. Create a new field.
  3. Select Formula and click Next.
  4. In Field Label, type My Formula Field. Notice that Field Name populates automatically.
  5. Select the type of data you expect your formula to return. For example, if you want to write a formula that calculates the commission a salesperson receives on a sale, you select Currency. For now, pick Text.
  6. Click Next. You’ve arrived at the formula editor! Time for our tour.
Monday, February 6, 2017

AgilePoint NX for SalesForce

To set up AgilePoint NX for SalesForce:

Enable Authentications

  1. Sign up a SalesForce developer account and an AgilePoint Trial App account.
  2. Log into SalesForce account, leave it open, in another tab, log into AgilePoint NX.
  3. Enable Authentication for SalesForce in AgilePoint NX: Settings > Admin Setting > choose SalesForce
    • image

Set up Global Access Token

  1. In AgilePoint NX, Manage > App Builder > Global Access Token > click the + sign to add a Global Access Token
    • image
  2. In SalesForce, ,<YourUserName> on the top right > Setup > type ‘App’ in the quick search box, select Apps > scroll down, click the new button of Connected Apps.
    • image
  3. Enter basic info (Connected App Name, API Name & Contact Email.
  4. Check the checkbox of Enable OAuth Settings. Copy the Redirect URL from AgilePoint NX Add Global Access Tokens window to the Callback URL field in the SalesForce UI. Then select Full access and ‘Perform requests on your behalf at any time (refresh_token, offline_access)’, and save.
    • image
    • image
  5. In the next screen, obtain the Consumer Key and Consumer Secret from SalesForce UI, then enter those values to Client ID and Client Secret ID fields on the ‘Add Global Access Tokens’ pop up window.
    • image
    • image
  6. Scroll down, click on the ‘Get OAuth2 Access Token’ button. If the textbox refreshes and displays values, that means the connection to SalesForce is successful.
    • image
  7. Select 2 hours for Renewal Rate to refresh the access token and check the checkbox of Encrypt. Click Done. By now, the Global Access Token shall be added.

Sunday, December 18, 2016

Data Security


  • 2 ways to set object permission - Profile & Permission Set.
  • Big picture of Profile:
    • image
  • Record Level Security
    • image
    • image
    • Sharing settings = Org wide default (OWD)
    • Question:
      • https://trailhead.salesforce.com/data_security/data_security_records
      • “When object- versus record-level permissions conflict, the most restrictive settings win.”
      • If object-level is more restrictive than record-level, who win?
      • Conflict with “If the organization-wide defaults are anything less than Public Read/Write, you can open access back up to certain roles using the role hierarchy.”
    • image
    • image
    • Organization-wide defaults can never grant users more access than they have through their object permission
      • Private - Only the record owner, and users above that role in the hierarchy, can view, edit, and report on those records.
      • Public Read Only - All users can view and report on records but not edit them. Only the owner, and users above that role in the hierarchy, can edit those records.
      • Public Read/Write - All users can view, edit, and report on all records.
      • Controlled by Parent - A user can perform an action (such as view, edit, or delete) on a contact based on whether he or she can perform that same action on the record associated with it.
  • Role Hierarchy
    • image
    • image

    Sharing Rules

    • Share an object to other roles, if the Org wide default of the object is less then Public Read/Write (or is set to Private).
    • image

Tuesday, October 6, 2015

UX: TALK TO REAL PEOPLE

Lesson 2 Chapter 4

Big Idea #3: Talk to Real People

  1. Talk to users (not clients, not co-workers). Car Rental case study: 12 interviews, 2 hours each.
    • Clients do not necessarily know what users want.
  2. Coding is expensive. Re-coding is even worse.
  3. Ask open ended questions: “How would you like to find your dinner?” vs “Do you like Taco Bell?”
  4. Listen to the clues:
    • Don’t ask: Do you like vertical or horizontal navigation bar?
    • User: My son is diabetic and I have to plan to his meal.
    • User: It’s really hard to use my phone and juggle the kids.
  5. Ask the user to do something, then sit back and observe. If the user get stuck, what would the user do next?
  6. Validating our assumptions about who the user is and what the user want is the reason we do user research.

UX: LIKE ‘EM

Lesson 2 Chapter 3

Big Idea #2: Like'Em

  1. Help users to be awesome.
  2. Focus on users goes down in the mid to end phase of project due to stress and deadline, but it's so important to focus to users that period.

Ref:

http://gymnasium.aquent.com/course/103/305

UX: How to take 'You' out of the user


Lesson 2 Chapter 2 (9/24/2015)

Big Idea #1: Finding your users and their goals
  1. Client goals
    • Make money
  2. User goals
    • Make life easier
    • Save money
    • Be awesome
  3. What to prioritize in your project: The user is _____ who wants to _____
Ref: